Saturday 31 October 2020

Happy Halloween


This is another card that went all the way to the Netherlands.
I have used a 6x6 white base card placed a piece of patterned paper on the top. I had this lovely die cut I brought so placed that at the top I used a little glue to adhere it to the card. 

I then took some white card and stamped my little critters punched them out then added a little colour to the count placed them on foam pads and card done.


Thursday 29 October 2020

Happy Anniversary Card


I can now share this as it has arrived in the Netherlands .

A base A6 card with a white mat then a mat of heart paper and then I took a piece of white card stamped my sentiment and then my rings in black ink. I decided to die cut with a stitched edge die and raise this to add a little dimension. 

Tuesday 27 October 2020

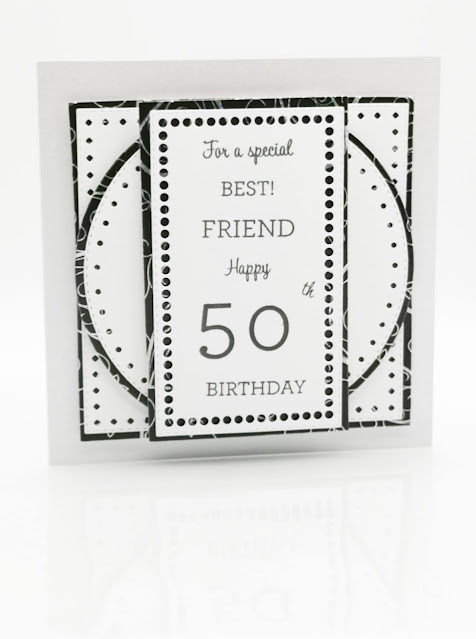
Happy 50th Birthday card


I can share this card now as it has arrived. I made this card for my best friend in the Netherlands. We have been friends on Facebook for many years. We send cards to each other for all different occasions and at Christmas we send each other presents. 

This is a 6 x 6 pearlescent base card and I used my John next door layering dies 5". The black edge card you can see is glossy and has holographic swirls. I wanted to make a special card as it's her 50th.

I used a stamping platform for my sentiment.

I am so glad my Bestie loved it.


Sunday 25 October 2020

Gemini Mini - Shell's Craft Corner


This is a great little die cutting machine to have . Just a little die to do this is the answer. Like I said in the video I got mine during Crafters Companions Birthday week.

Hence the Gemini Mini the extra folders and shim and a cute bag to keep it all in.
The Thank you Die was a free gift for spending a certain amount that day.

Link to view from Craft Stash 

 Gemini Mini https://tidd.ly/2FVV1zk 
Happy Birthday die https://tidd.ly/37GYOfs


Links to view From Crafters Companion 

Happy Birthday Die https://tidd.ly/2Ypj1kk

Friday 23 October 2020

Merry Christmas Happy New Year


Oh these new Lisa Horton die are great I have taken a Black slimline card and then a  and matted this on my card. I then die cut four scalloped squares and then I stamped and coloured my Snowman and Mousse and stamped my greeting. I then took the hexagon shaped stitched die and die cut them and placed foam pads onto the back to raise them from the card. I really like how this card turned out.

This next card was created after seeing my waste piece from the above card. Here is the card and I will explain how the card came to be.


I had this piece of white card left over from the above card and thought I wonder if I die cut another hexagon out I could then use it as a raised outline.

So I cut the 4th hexagon took another piece of white card and placed it underneath and got some stamps my Reindeer, Snowman, Penguin and Elf that would fit into the hexagon.

Out came the Tri Blend pens to colour them and I stamped Two Merry and a Christmas cut them down to fit in the middle pieces.

I then placed foam strips all around the edge and the middle and placed it over my images and then onto a 6 x 6 card.

So don't just throw the scraps away you maybe able to make a card like I have here.

Lisa Horton die the link is https://tidd.ly/3jglIMS

Lisa other sets of dies think I may have to get those too.


Wednesday 21 October 2020

Happy Halloween


 I just love this set and it will be with me for years to come. 

I took a base A6 card and matted it with a piece of patterned paper. Then I took a piece of white card and stamped my three images . I then punched them out and added some colour but colouring a few parts on each image  I have placed them onto foam pads to raise them from the card.

Lastly I  stamped my Happy Halloween and cut the ends to make it look like a banner and raised this with foam pads too. 

Monday 19 October 2020

Happy Birthday Card


I love these Banner Alphabet dies there just so cute and different.

I have taken an A6 card in a dark purple colour then matted it with a smaller lilac gingham patterned paper then taken a lighter purple card and a very light purple card and used my John next door circle layering dies and die cut all three pieces and then cut it in half making a half moon shape.

I then used rainbow card and black card to die cut my banners and banner letters and then I have raised then using foam pads. 

Sunday 18 October 2020

Craft Haul 3 - Shell's Craft Corner


Hope you enjoyed watching my latest craft haul I really love getting new products to play with.
I have made some cards with some of my latest craft hauls as you will see by my other posts and future posts.


These are great paints from Hobby Craft and like I said in the video I have some mdf hearts and other pieces so now to find them and have a play.


Can't wait to build and decorate this just trying to think of a way to show you how to decorate one maybe I could leave one side blank to show you how to do this on You Tube.
Here is the link if you wish to view or  purchase the Lantern https://tidd.ly/3kg7g96


Loving these dies I like that you have a scalloped edge and a stitched edge You will see these used in a blog post shortly. Here is the link if you wish to view or purchase these dies. https://tidd.ly/3o598DV


I have seen so many cards made with this die and gave in and purchased it I have yet to have a play. 


I just love these foam strips I have brought a nice stash now as I seem to be using them all the time. Here is the link if you would like to purchase some. https://tidd.ly/2T2eJwi


Yet to play with this will let you know how it goes.


I have also yet to have a play with this so watch this space.

Thank to you all that watch my You Tubes and view my blog it really means a lot to me.

Thanks Shell x

Thursday 15 October 2020

Large Butterfly card.


I have always loved this large Butterfly stamp it's just sitting on an 6x 6 card. I took a piece of white card and then stamped my Butterfly with versa fine and black ink and then covered in clear embossing powder and heated with my heat gun so it's all nice and glossy . 

I then to my oxide inks and rubbed them over my butterfly this card is so pretty for real.


Tuesday 13 October 2020

Merry Christmas and a Happy New Year Card


So here we have a cute slim line card. I used Black as my base card then some lovely rainbow card as a mat. and the white frame and blue square are left overs from another card I made a couple of weeks ago.

The stamps are the free ones of a magazine also from the last slim line card I made.

I just stamped on the blue pieces and stuck them onto the white stitched frame and them put it altogether.


Sunday 11 October 2020

Christmas & New Year Cards - Shell's Craft Corner


Here is my latest You Tube video  

I really enjoyed making these cards and they are not just a plain card you get to stamp die cut and layer so a bit of everything.

Love the new John Next Door layering dies I have used the 5" one think I may get the 6" too I don't make many big cards so don't think I will get the 7" set. They all work really well together.

Details of all products and links are below my video you just need to click the show more.

Thanks for visiting my blog and watching my You Tube

Shell x

Here are the cards.


Thursday 8 October 2020

I Craft So Hard I Sweat Glitter Cards


Using these fun stamps and dies again though I haven't used the dies this time. This time I have taken a different sentiment and I have made a shaker card. I took a base black card 6 x 6 then a piece of white card and stamped my cup and then my sentiment. I then took some clear doubled sided foam had this in my stash for years and finally I use it. I then placed some glitter inside the cup. I thought this goes so well with the sentiment.


My second card I have used a base black card A6 the cup just fits I stamped my image and die cut it I then took my Spun Sugar Oxide ink pad and blended it to make my cup pink my favourite colour. Then I covered this with my Nuvo Moonstone glimmer paste to add the glitter effect . This was hard to photograph as the glitter kept reflecting with the light.


Tuesday 6 October 2020

Couple of cards for the men


 Today I made a couple of cards for the men well I say men I suppose they could be used for anyone but I had the men in mind when I made them.

I took a nice 6 x 6 black base card and matted it with some grey striped paper then I took my new John next door dies and die cut all three square dies bottom mat black straight edge then a white card with both the stitched edge die and the I will call it dotted edge ( the little punch holes) This piece I raised with foam tape. Then I used double sided tape to adhere this to the card. I then stamped a Happy Birthday and die cut it my banner die and used foam pads behind.


For my second card I have changed to an A6 base card and used a dark blue colour card stock and striped paper. I then stamped my bike image with black ink and die cut this with an oval stitched edge die and then took a bigger plain oval and die cut it out in the dark blue. I then stamped my sentiment and cut this with a trimmer and then matted it on the dark blue card again. Both the image and sentiment are raised with foam pads and the taped and adhered to the card.


Sunday 4 October 2020

This Weeks Craft Haul - Shell's Craft Corner


Don't you just love getting new crafty goodies I know I do so here in this video you can see what I have been buying some items I have already used like my Stamps and dies my lovely crafty mug cards and I have also made cards using the Seahorse die the rest I have yet to play with.


I have made a card using these Alphabet dies today so will be on my blog later this week.


I have had a play with this today not bad at all I am liking it. Maybe a You Tube on this.


I have stamped the Robin and a sentiment now to get the tri blends out and start colouring watch this space.


I have yet to get these out the packet and have a play.


Yet to use this too.


Happy Crafting till next time Shell xx


Thursday 1 October 2020

Seahorse Cards


 Today I played with my new Sea horse die from Creative expressions link is here  https://tidd.ly/36mDOKb   

I made a base Black card then I matted it with some rainbow glitter card . I took a piece of white card and placed it on my Wild spider sticky roll double sided tape  link here https://tidd.ly/34e1Ggp   I then placed my die on to this and ran it through my die cutter. Next was to get all the unwanted pieces out I then took a blending tool and blended my Peacock Feather oxide ink over my Seahorse.

Finally I pull my backing off and placed onto my black mat and the adhered that onto my rainbow mat and then adhered onto my base card and all In all I am pleased with how my card has turned out.

My next card I have changed my base card to a light pink card and My seahorse blended with my Spun Sugar oxide ink and matted onto a glitter card then a black mat and finally matted onto my base pink card.


Thank you for visiting my blog Shell x